

JAR TEST PROCEDURE
The testing begins with the determination of the optimum dosage of the coagulant. After recording the raw water turbidity, the procedure is as follows:
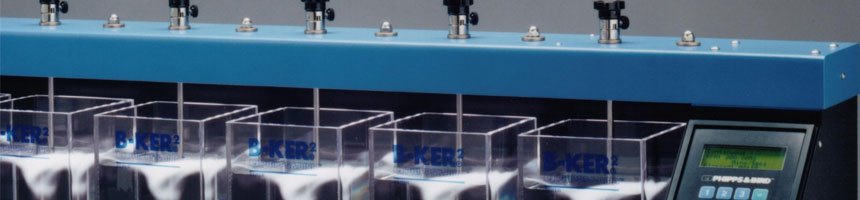
- Fill each jar to the 2-liter mark with raw water.
- Carefully pipette the dose destined for each jar (0.1% coagulant solution) and place in a small beaker beside the jar. Record each dose.
- If alkalinity is needed, measure out the lime solution for each jar and dose in advance, mixing slowly. Record each dose.
- Example of first test run —
Raw water turbidity – 37 NTUStep 1 – Jars
Dose – A12 (S04) mg/1 ——– 5, 15, 30, 50
For a coagulant solution of 0.1% or 1 mg. m1, this means 10, 30, 60, and 100 ml, respectively, in each of the four 2-liter jars.
Step 2 – Initial mix.
Pour measured coagulant dose from the small beaker into each jar with Phipps & Bird Stirrer at 300 RPM.
Step 3 – Flocculation.
After 10 seconds of initial mixing, reduce mixing speed to 100 RPM and maintain for 2 minutes. Then reduce mixing speed to 60 RPM and maintain for 3 more minutes. After 5 minutes, reduce mixing speed to 20 RPM and continue for 15 minutes more. Total flocculation time – 20 minutes. Just before the end of the 20 minute flocculation, drain the jars down to the 2 liter level to compensate for the increase in volume due to the 10, 30, 60, and 100 ml of coagulant. See figure 2.
Step 4 – Settling.
Stop stirring and begin settling cycle. In order to better approximate the clarification, it is good practice to allow a lag time of about 30 seconds from the time of stopping the flocculation to the beginning of settling. This is about the time required for the fast rotary motion to subside. In a plant, it is about the time required for the flocculated water to go from the flocculation to settling basins before settling begins.Start timing with the stop watch set back to zero. Since settling velocity curves will be plotted, samples will be taken from each jar at 1, 2, 3, 5, and 10 minutes. Just prior to the sampling time, the siphon tube should be drained. This will be about 5 ml of liquid. Since there are at least four jars, two people need to be available to take the samples to avoid a serious time lag between sampling each jar. With a little practice, one person can take two samples at the same time so with two people sampling, the four can be taken simultaneously.The procedure is repeated for the samples taken at each sampling time, i.e., 1, 2, 3, 5, and 10 minutes. For the light scatter turbidimeter a sample of 30 to 35 ml is sufficient for a turbidity reading so that the sample can be taken quickly and the liquid level in the jar is not lowered significantly. Larger samples should not be taken since it would unnecessarily lower the level of the water in the jars.
With four jars, there will be 20 samples for determining turbidities. The turbidimeter should be checked for calibration for the range anticipated. Some instruments are calibrated for over 10 ntu or under. Turbidity readings are then made on each sample and recorded. Samples should be agitated carefully before pouring into the turbidimeter tube. A direct comparison or turbidities for each group of samples, 1, 2, 3, 5, and 10 minutes can be made.Step 5
After the first trial run the process is repeated, choosing dosages around that which, in the first run, gave the best clarification, i.e., the lowest turbidity. The range of turbidity of the 5 minute sample for a near optimum dosage should be in the range of 2.0 to 5.0 ntu. When the optimum or near optimum dosage is determined, this quantity of coagulant should be used for all subsequent work with the same raw water. This same procedure should be repeated for determining optimum dosages of all coagulants that may be utilized.Step 6
— Take pH readings of each jar of the trial run, giving optimum clarification and record. Those jars with higher dosages should give lower pH readings.Step 7
— Example of most effective coagulant doses are shown in Figures 3 and 4. A dose of 13 mg/1 comes out to be the best. It is almost equal to 16 mg/1 in terms of sample turbidities.The next variable to be determined will be polymer dose in case the use of a polymer is contemplated. It must be remembered that the charges which the polymers carry determine how they react. The positively charged cationic polymers act like coagulants and are used to supplement the coagulant dose. Sometimes by adding a small dose of cationic polymer during initial mixing, the coagulant dose can be significantly reduced. It may therefore be economical to use a combination of coagulant and polymer. The feasibility of the procedure can be determined by bench scale testing in the laboratory. Along with determining the quantity of polymer, the sequence of addition of coagulant and polymer may be important. It will be necessary therefore to determine which should be added first and which second. Occasionally the polymer alone will form a satisfactory floc.
The non-ionic polymers are used to assist in the agglomeration of floc to assist in settling. In this case, the polymer must be applied after the floc has been formed. If it is applied too early before all the floc has formed, it will be less effective. If applied too late there may not be enough time remaining for optimum floc formation. It is important therefore to carefully test for the best point in the flocculation process to add this polymer. Experience indicates that the best time is about 5 minutes after the beginning of the flocculation cycle.